How to set up a team AI agent in your own cloud: the full architecture
The complete setup for a Slack-based AI agent on your own EC2 instance - the request path, the Agent SDK configuration, tools, sub-agents, channel routing etc.
Earlier posts in this series covered what our agent does - debugging, blog publishing, image work etc. This one covers how the whole thing is put together in just enough detail that you can set up an equivalent agent in your own environment. We run ours on Slack and AWS because we already use both. You can swap these with Teams and Azure and the architecture still stays the same.
There is no code in this post - every piece described here is something a coding agent can build for you from a clear description.
The big picture
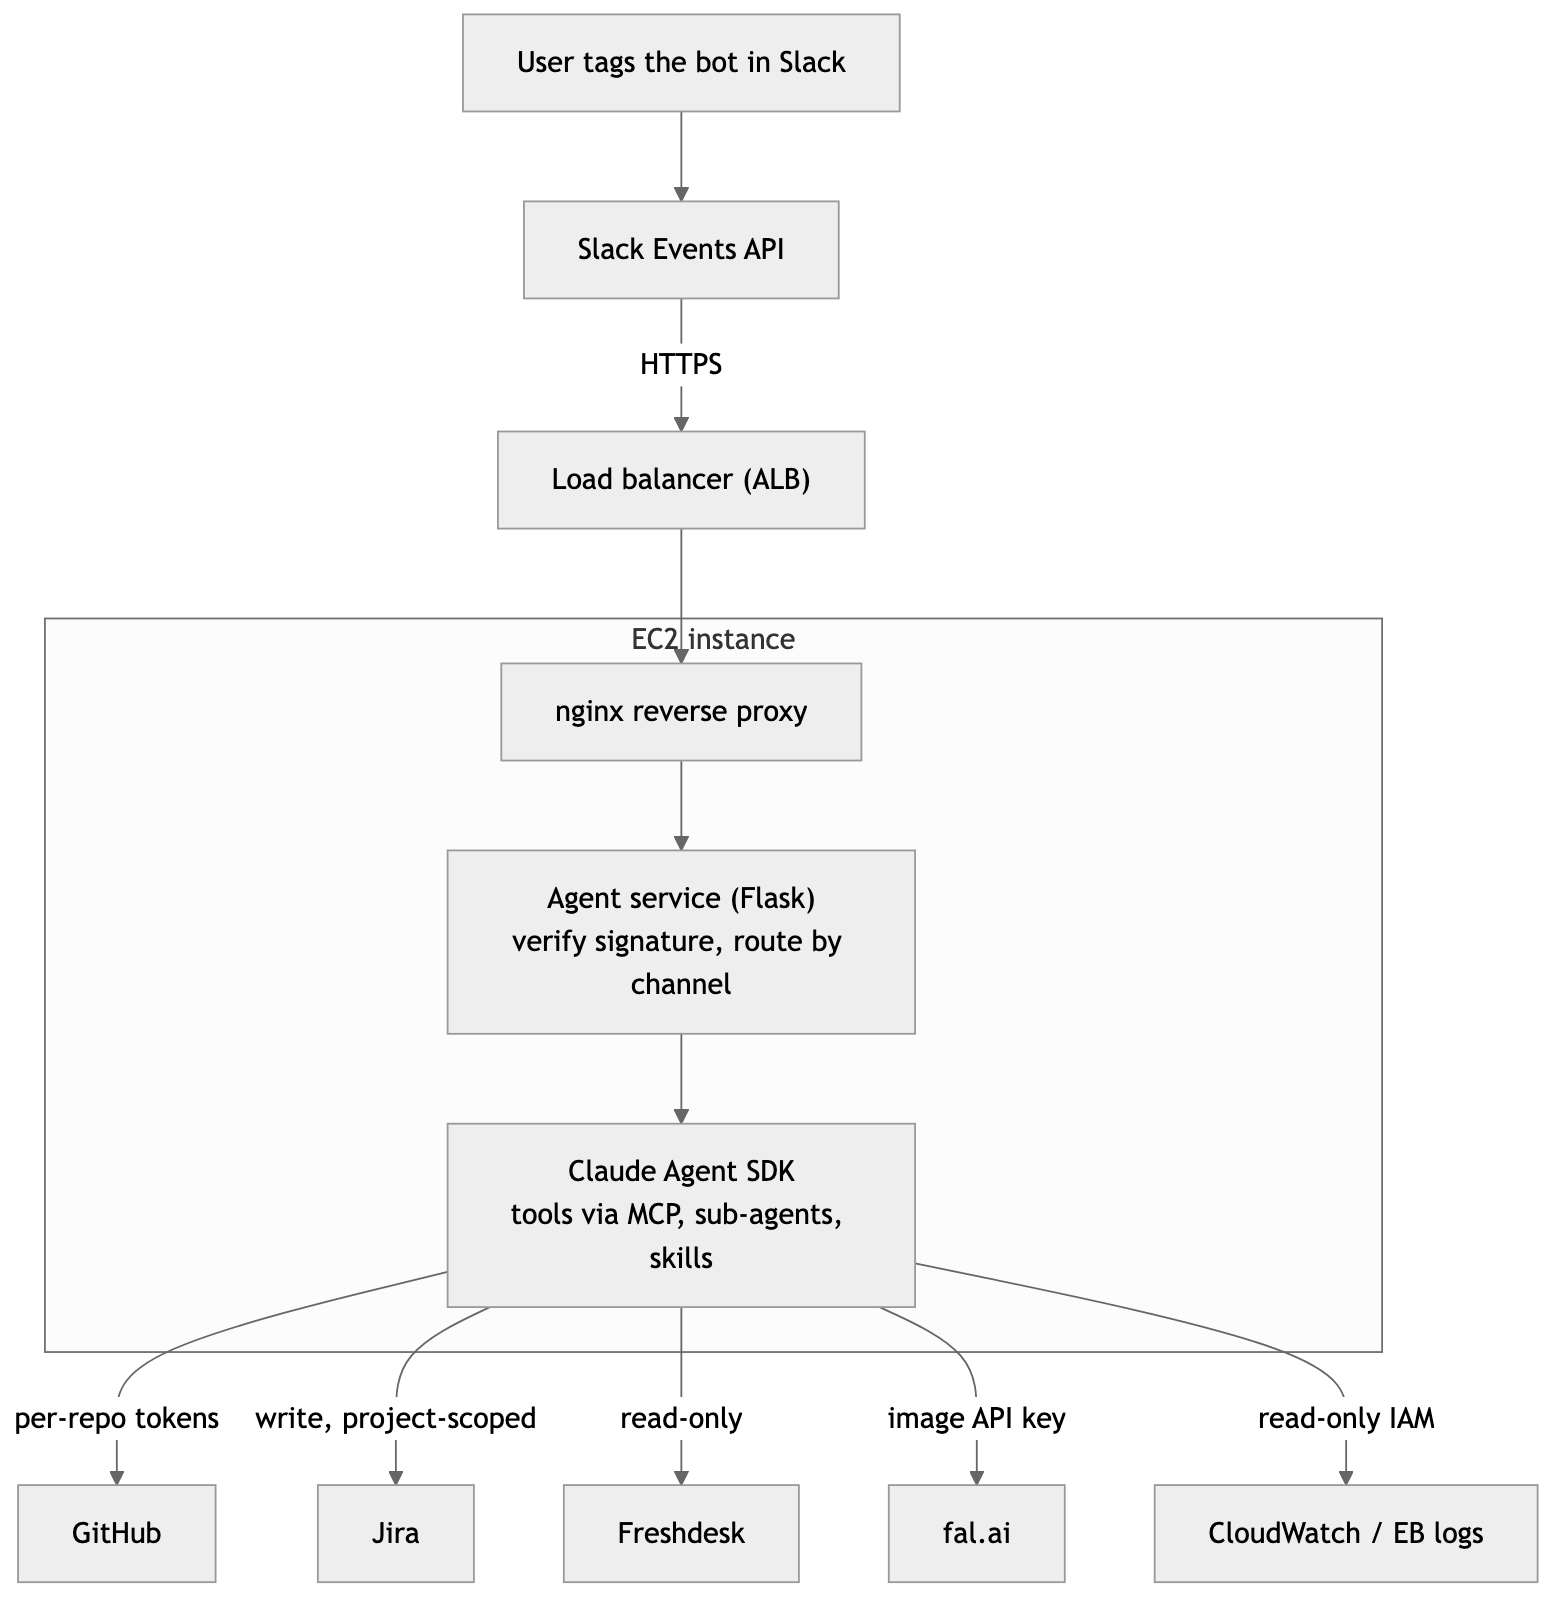
The EC2 instance hosts the agent service built on Claude SDK. For all third-party services a separate scoped credential is used.
The front end: a Slack bot
Since our team already uses Slack, working with an agent didn't require any change in their typical workflow. Instead of tagging a real person, they now tag the "Shikau" agent in the appropriate channel and explain the task. The Slack side needs four things -
- A Slack app with a bot token and the scopes to read and post messages (
app_mentions:read,chat:write, the history scopes for channels and DMs). - Event subscriptions pointed at your endpoint. We handle
app_mentionfor channels andmessageevents for DMs. - Signature verification on every incoming request, using Slack's signing secret. This stops anyone else from posting jobs to your agent endpoint.
- An immediate
200 OKresponse. Slack retries if you take more than three seconds, so the handler acknowledges instantly and does the actual work on a background thread.
For long jobs, the agent posts progress into the thread as it goes ("parsing the log", "checking known patterns") instead of going silent. Without this, people assume the bot is stuck and ask again, which starts a second expensive run of the same job.
Two key points here to save you some work -
- The Slack thread is the conversation memory. When the agent restarts after a deploy or a crash, it rebuilds context for an active conversation by reading that thread's history back from Slack - you don't really need to build a conversation database
- We use the Events API over HTTPS rather than Slack's Socket Mode, because the instance already sits behind a load balancer with a public endpoint. If you cannot expose an endpoint, Socket Mode does the same job over an outbound connection.
The engine: the Claude Agent SDK
The agent itself is the Claude Agent SDK - the same engine as Claude Code, run as a shared service instead of on one person's laptop. Each incoming request starts an SDK session configured with -
- A system prompt picked by who is asking. A small
users.yamlfile maps Slack user IDs to a role (developer, support, admin) and expertise. A support person and a developer asking the same question get answered differently, and some capabilities (like teaching the agent new error patterns) are admin-only. - A model, and a fallback model. Routine work runs on Sonnet; we use Opus for complex debugging or writing content drafts. On an API overload error the session retries on the fallback model instead of failing.
- An allowlist of tools. The session only gets the tools its channel is supposed to have.
The Claude Agent SDK gives you three ways to add capability -
| Mechanism | What it is | Use it for |
|---|---|---|
| Tool | A Python function the model can call (exposed via MCP) | Anything that touches the outside world: call an API, read logs, generate an image, restart a service |
| Sub-agent | A markdown file defining a specialist with its own prompt and tool list | A multi-step job that deserves its own focus: draft a blog post, debug a log bundle, generate a kiosk theme |
| Skill | A folder of instructions and reference docs, no code | Procedural knowledge: how our CMS publishing works, what our theme spec looks like, where the troubleshooting docs live |
Note that Sub-agents and skills are just markdown files in the repo.
Routing: the channel is the router
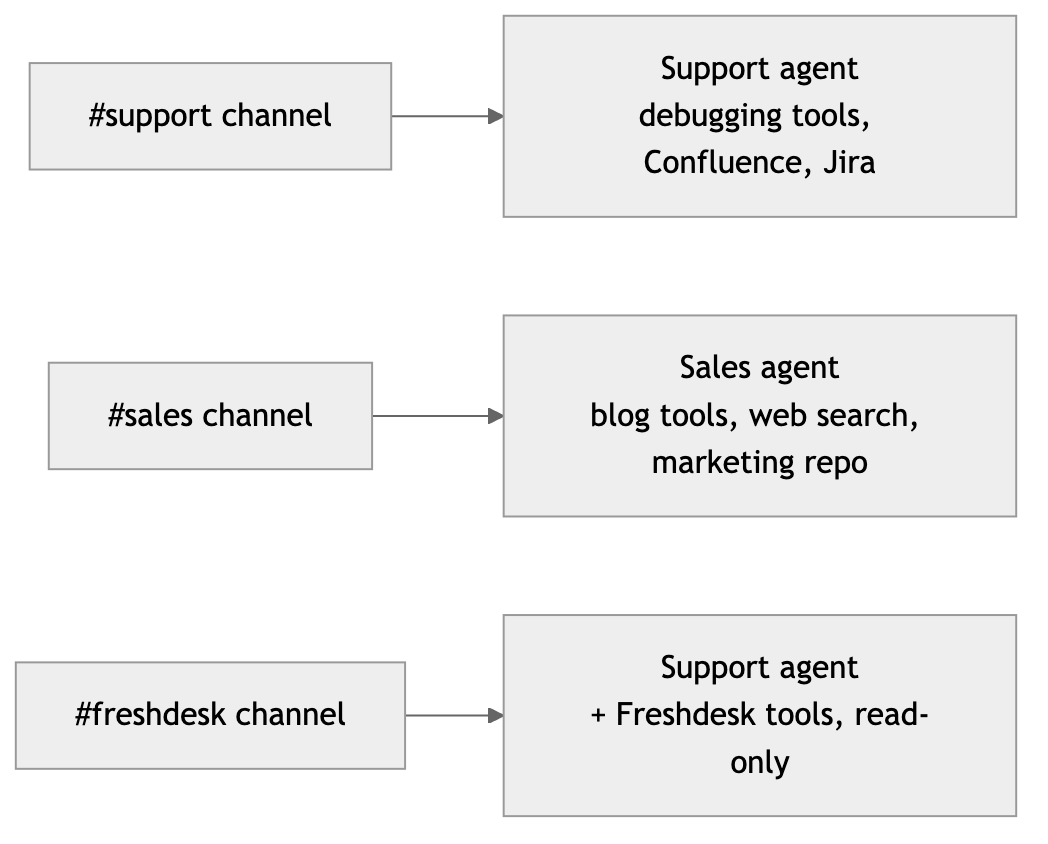
There is no intent classifier and no model call deciding where a message goes. The Slack channel ID is the routing key, looked up in a config file. This is much simpler to code and manage since channel membership acts as access control already enforced by the workspace. For example, the support metrics live in a private channel; whoever is not in that channel cannot ask about them.
Why run it in your own cloud account
We give the agent real access - production logs, source code, the support inbox. Running it on our own EC2 instance, rather than handing that access to a managed agent running in someone else's environment, gives us four boundaries we can set and verify ourselves -
- Identity is our IAM role. The agent inherits the EC2 instance role. Anything it can do on AWS is bounded by a policy we wrote.
- Egress security group. The agent can only reach services we opened a path to. This holds even if the model misbehaves or a prompt injection tells it to call somewhere it should not.
- The logs are ours. Every prompt, tool call, and response lands where we control it. When we need to know what the agent did, we read our own logs. (These same session logs power the cost dashboard, covered later in the series.)
- No third party holds our prompts. Support tickets, code, debugging sessions - all of it stays in the account.
What it costs you is the deployment work: the instance, the load balancer, nginx in front of the Flask service, a systemd unit to keep it running, an environment file for the credentials, and a few cron jobs - a git pull every few minutes so config, skills, and sub-agent updates deploy themselves, plus scheduled runs like the Monday-morning blog topic proposal. A small instance is fine; the heavy lifting happens in the model APIs, not on the box. Expect a few days to set it up and a small ongoing maintenance load.
The order to build it in
If you are setting this up fresh, this is the recommended sequence -
- Slack app + endpoint + signature verification, echoing messages back. No agent.
- Wire in the Agent SDK with no custom tools. You now have a general assistant in Slack.
- Add your first tool - pick one API your team touches daily (for us it was Confluence search).
- Add channel routing and a second, differently-scoped agent.
- Add skills and sub-agents as the jobs get more specific.
- Add the cron jobs last, once the reactive behavior is trusted.
Since we built this, Anthropic launched Claude tag, which delivers a managed version of steps 1 and 2 out of the box, hosted by Anthropic. Whether that trade works for you depends on whether your agent needs to act inside your environment the way ours does - I compare the two properly in a separate post. Either way, the tools, routing, and scoping described here are common in both approaches.